Get started
Introduction
Thank you for using Archipelis Designer 4.0.
Archipelis Designer is an innovative concept in 3D design that you will find both exciting and easy to use. You can easely create professional looking models within minutes by simply tracing a background image or by just starting with a blank view.
The model is automatically textured as well as ready for export.
Archipelis Designer uses an intuitive approach to sketch out shapes which can then be enhanced with textures and photographs.
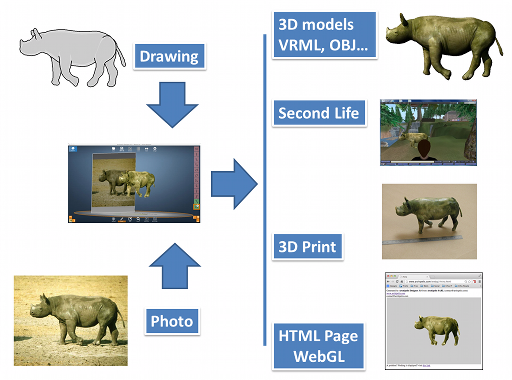
How to create 3D models with Archipelis Designer
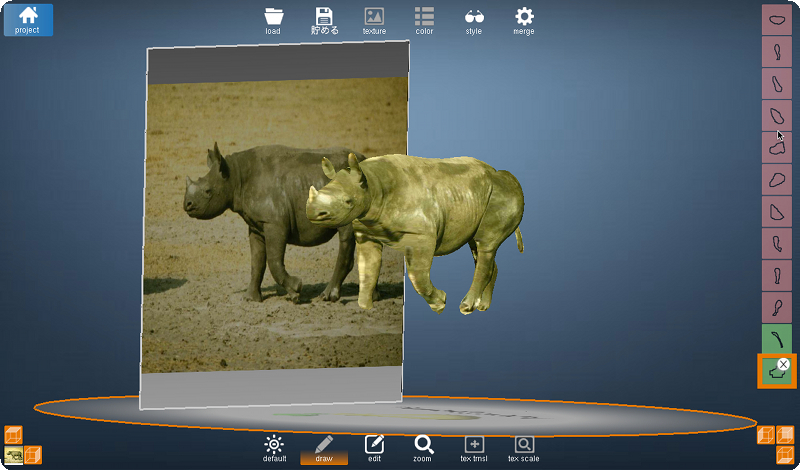
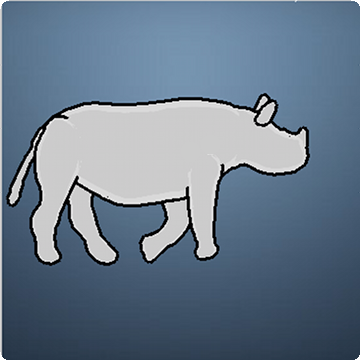
Archipelis Designer takes a different approach to creating 3D models by simply drawing its shape! Just draw the contour of the various shapes of the model (for example: the head, the body, the legs) and Archipelis Designer automatically merges them and applies textures. It is also possible to use a picture or photo as a background and follow the contours on it.
Thus, very simply and in about ten minutes, it is possible to create realistic organic models and to export them in widespread 3D formats like OBJ, Collada DAE, HTML 5.0 WebGL, VRML, X3D, DirectX 3DS Max and more over Second Life. The export feature is not available on iOS iPhone/iPad.
Main features:
- Draw 2D shapes to build 3D objects
- Reposition, reshape, scale and move shapes
- Merging process
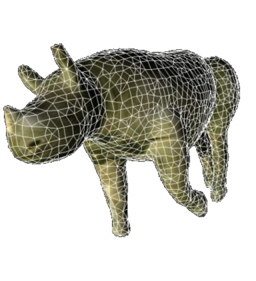
- Multi-resolution management
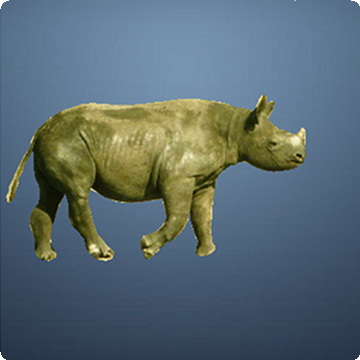
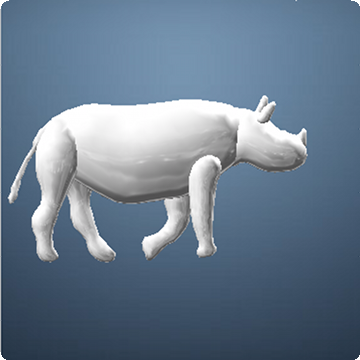
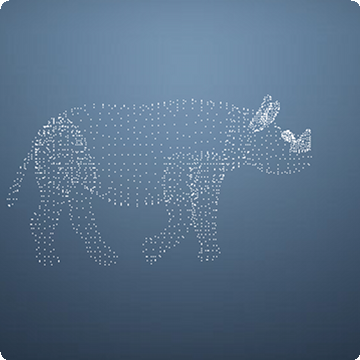
- Viewing modes: wireframe, smooth shaded, textured, cartoon, environment mapped, points as well as anaglyphic (stereo with red-blue glasses)
- Increased accuracy
- 4 panel or single panel viewing modes (not on iOS iPhone/iPad)
- Zoom in and zoom out
- Multiple texture management and texture baking
- Multi plane viewing selection so you can view your model from virtually any angle
- Mirror shapes
- Intuitive contour editing for precise and fast curve editing
- Undo management
- Multiple export formats: .obj, .wrl, .x3d, .x, .asc, .dae, .html with WebGL, .dxf, .off, .stl, .c (Open GL C code generation), Second Life sculpted prims (not on iOS iPhone/iPad).
- Connection to 3D print service
Principle
When you draw a contour in this drawing area, the
corresponding 3D shape appears. You can move around it. You can also change the size and location for instance with the "command circle".
You can draw a second shape near the first. When you click on [merge], the fusion of the two shapes is resulting in the unified 3D model with a parameterized quality/resolution.
It is also possible to work with pictures on the background. For that, just drag and drop an
image into the drawing area (note that on iOS there is no 'drag and drop', images come from the photo library).
This image is used as the basis of your work to draw various shapes.
Presentation of the user interface
Presentation
The desktop version looks like:
The iPhone version looks like:
The iPad version looks like:
The graphic user interface is made of various areas:
- Project menu (on top left)
- Top bar (on the top)
- Group section (on the right)
- Command circle (arround the current shape)
- Mode bar (on the center bottom)
- View selector (on bottom left and bottom right)
- Shape operators (on the left)
Project menu
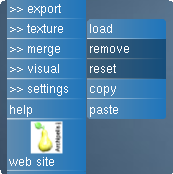
The content of the [project] menu is:
- [new]: to create a new project.
- [load]: to load a project (extension ".designer").
- [save]: to save the current project.
- [save as]: to save the current project under a specified name.
- [>> export]: to open the export sub-menu.
- [>> texture]: to open the texture sub-menu.
- [>> merge]: to open the texture sub-menu.
- [>> visual]: to open the visual sub-menu (not on iOS iPhone/iPad).
- [>> settings]: to activate/deactivate animations and sounds.
- [help]: to display this user manual.
- [web site]: to display Archipelis Web site.
- [quit]: to quit Archipelis Designer (not on iOS iPhone/iPad).
Group section
In Archipelis Designer, a group is a set of shapes that can be merged together. But, note that two groups "do not merge" together. Most of the time the groups can be used to represent two different objects in a single 3D model for example.
Each group (i.e. set of shapes) is identified with a dedicated color as a column on the right side and the current selected shape is surrounded in Orange. The little white cross in the selected shape is to remove it. Shapes in groups are organised this way:
- Group 1 in Red
- Group 2 in Green
- Group 3 in Blue
- Group 4 in Red
- Group 5 in Green
- Group 6 in Blue
- ...
You can create a new group using [merge >> add group] command.
Top bar
The top bar allows you to use the main commands.
- [load]: to load a project. (not on iPhone).
- [save]: to save the current project. (not on iPhone)
- [texture]: to add a new texture image.
- [color]: to modify the color of the current shape.
- [style]: to modify the visualization style of the model.
- [merge]: to merge the model (not on iPhone).
Regarding the possible visualization style, here is what you can get:
-
[wireframe]: to display the 3D model in "wire frame" style (i.e. you can see the 3D mesh).
-
[standard]: to display the 3D model on a standard way (colored and smooth shaded).
-
[textured]: to display the 3D model with all the available textures mapped on it.
-
[cartoon]: to display the 3D model with a cartoon like rendering.
-
[envmap]: to display the 3D model with an environmental mapping style that gives a chrome or metal looking appearance.
-
[points]: to display the 3D model with only the vertices of the mesh.
Mode bar
Several modes are available, the current active one is identified by an orange background.
- [default]: to set the default behavior. You will have access to the interactions like picking a shape, turning around the model, using the command circle.
- [draw]: to set the drawing mode. You will be able to draw a 2D contour in the drawing area.
- [edit]: to set the edit contour mode.
- [zoom]: to zoom in or zoom out. To zoom in, start with the top-left and finish with the bottom-right of the area you are interested in. To zoom out, simply do the same from bottom-right to top-left.
- [tex trnsl]: when one of the 6 views (face of the virtual cube) is displayed, you can translate the associated texture. (not on iPhone).
- [tex scale]: same as [tex translation] but for scaling. (not on iPhone).
Views
You can find 6 buttons on the bottom of the screen to set one of the 6 point of view corresponding to a cube (front, top, left, back, bottom, right).


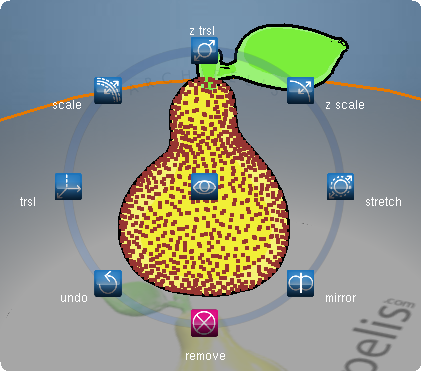
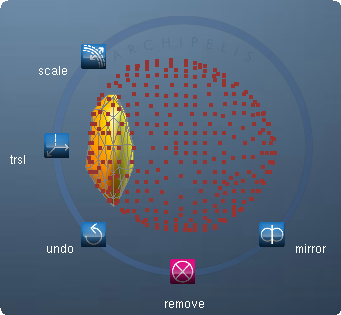
Command circle
For the current shape, a circle is displayed around. Here you have access to several commands which are listed below:
- [trsl]: to translate the current shape on the plane related to the viewpoint.
- [scale]: to scale the current shape in all directions.
- [z trsl]: to translate the current shape on the depth axis (relative to the view where the shape has been created).
- [z scale]: to shape the current shape on the depth axis (relative to the view where the shape has been created).
- [stretch]: to strech the current shape on the depth axis (relative to the view where the shape has been created).
- [mirror]: to duplicate the current shape.
- [remove]: to remove the current shape.
- [undo]: to undo the last change with command circle.
- [shape view]: to display the view used to define the current shape (this button is on the center of the command circle).
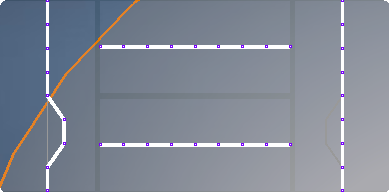
Edit
Contour
You will be able to modify the contour to correct errors and bad drawings as shown in the figure below. Once finished, you will have to click on another mode to apply the modifications (regeneration of the 3D shape base on the new contour).
Embossing
It is possible to create emboss effect by making curves. Four curves can be edited: for front-horizontal, for back-horizontal, for front-horizontal, for front-vertical.
Here are examples:
This feature does not exist on iPhone.
Textures
Archipelis Designer allows you to load multiple textures on each viewing plane (i.e. up to 6 textures for each face of a cube), when you trace an image the texture is automatically applied to the 3d model.
- The [load] command loads a new picture (".png", ".bmp", ".gif", ".png", ".tiff" extensions). Archipelis will load the texture and put it on the current face of the virtual cube.
- The [remove] command remove the current texture.
- With the [reset] command you can reset the current settings of the current texture (i.e. no scale and no translation applied).
- With the [copy] command you can copy the texture into the clipboard in order to use it with another software (not possible on iOS iPhone/iPad).
- With the [paste] command you can retrieve the texture which is inside the clipboard and apply it. (not on iOS iPhone/iPad).
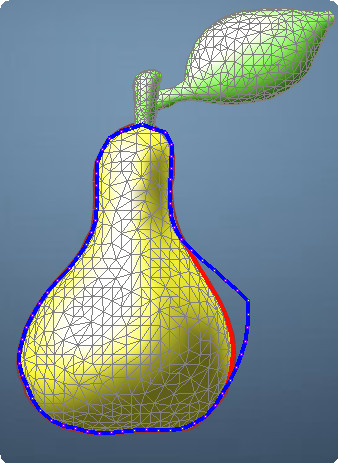
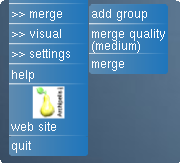
Merging
With this menu you can choose the quality of the merge of all the groups with [merge Quality]. [low] setting allows you to make a lower poly model (but less precise), as [no limit] makes the higher resolution model (it is time consuming and generally not so useful). [medium] and [high] are intermediate settings.
[merge] starts the fusion of the shapes to create the final 3D model.
As already explained, you can create a new group using [add group] command.
|
|
For instance, in the previous image, you have an example of a model without merge
and the same model being merged.
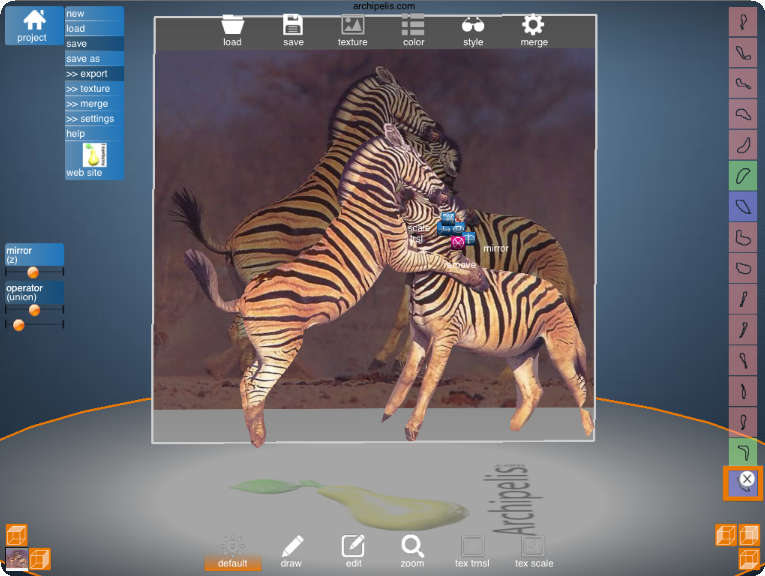
Shape Operators
Mirror
It is possible to mirror shapes using:
- [mirror]: to duplicate the current shape you can set [x] or [y] or [z] (the axis is defined within the view where the shape has been created). If no mirror feature is applied, [none] is used.
- Cursor [delta mirror]: to shift the mirrored shape relative to the mirror axis (this feature can be used to slightly break a global symmetry of the 3D model being created).
Merging operators
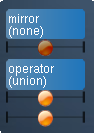
Archipelis Designer works with shapes to build the final model. Each shape belongs to a group. When each shape is selected you can choose through boolean operations to define how to merge the current shape with others within its groups, whether to add, substract or intersect.
- [operator] can be [union],[intersection],[difference 1],[difference 2]: to choose the way the current shape is inserted into the 3D model. It is either by union (this is the most common case), either by intersection (only the common area is preserved), either by difference number 1 (it is the remainder of the group "minus" the current shape) or by difference number 2 (it is the current shape "minus" the remainder of the group).
- Cursor [x swivel]: to swivel the shape on the X axis (the axis is defined within the view where the shape has been created).
- Cursor [y swivel]: to swivel the shape on the Y axis (the axis is defined within the view where the shape has been created).
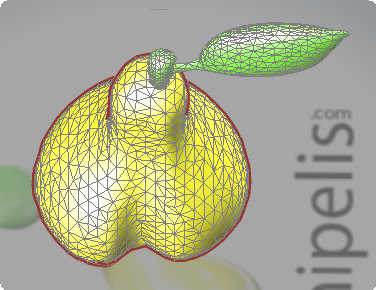
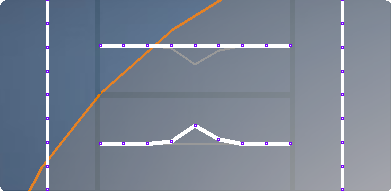
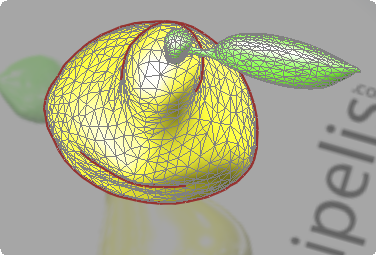
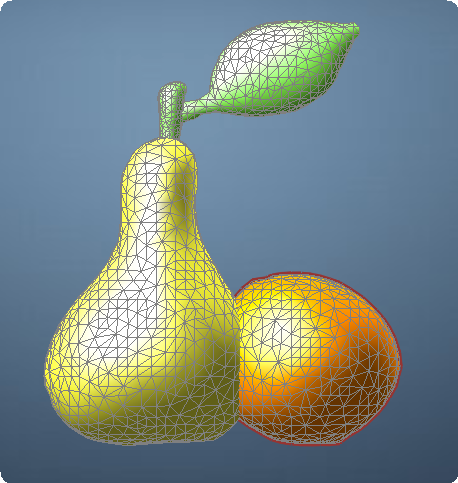
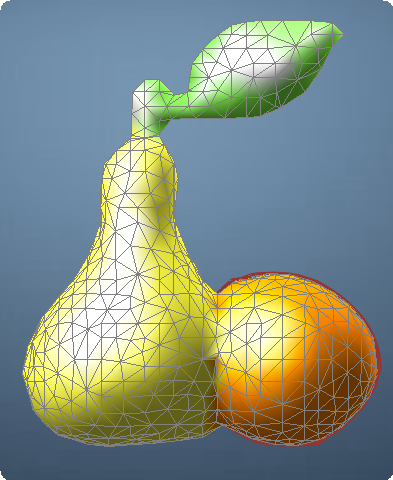
Let us take an example to illustrate the operators.
Here you have a pear. An orange has been added on the right with [union] operator. The model is then merge and the result is:
With [intersection] the result of the merge is:
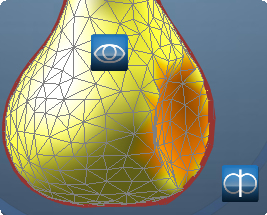
With [difference 1] (i.e. "pear minus orange") the result of the merge is:
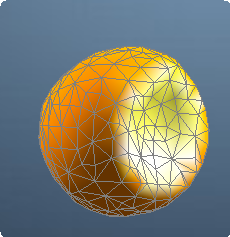
With [difference 2] (i.e. "orange minus pear") the result of the merge is:
Visualization
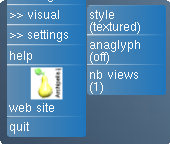
In the visualization menu, you will find:
- [style]: to select the visualization style (wireframe/standard/textured/cartoon/envmap/points).
- [anaglyphic]: to display the anaglyphic 3D mode (red and blue glasses are needed to catch the relief feeling, 'invert' stands for blue-red instead of red-blue).
- [nb views]: to select 1 or 4 paneled views.
This menu does not exist on iOS iPhone/iPad.
Settings:
The Settings menu allows you to activate or deactivate:
- the animations once a new shape is created,
- the sound,
- the grid on all the texture images.
Exports:
3D formats
Archipelis designer can export to a variety of formats. Your may choose from the following export options.
Before exporting you will need to save the project and name it.
This is not possible on iOS iPhone/iPad.
Export formats are:
- [3DS Max Ascii (.asc)]: to export to Autodesk 3DS Max ascii format (the texture is not exported).
- [C OpenGL code (.c)]:to generate a C code with OpenGL that displays the model (the texture can be exported).
- [collada (.dae)]: to export to Collada format (the texture can be exported).
- [Project Dogwaffle/Howler]: to export to Project Dogwaffle/Howler. This is not possible on Windows.
- [Autocad DXF (.dxf)]: to export to the DXF format (the texture is not exported).
- [wavefront/Maya OBJ (.obj)]: to export to Autodesk Maya OBJ format (the texture coordinates can be exported).
- [DEC OFF (.off)]: to export to DEC OFF format (the texture is not exported).
- [Second Life]: see coresponding section for more explanation.
- [STL (.stl)]: to export to the STL format (the texture is not exported).
- [vrml 1.0 (.wrl)]: to export to VRML 1.0 format (the texture can be exported).
- [vrml 2.0/97 (.wrl)]: to export to VRML 2.0/97 format (the texture can be exported).
- [html 5 WebGL (.webgl)]: to export to HTML 5 WebGL format (the texture can be exported).
- [Microsoft DirectX (.x)]: to export to the Microsoft DirectX format (the texture can be exported).
- [X3D (.x3d)]: to export to the X3D format (the texture is not exported).
Note:
If you need to export the 3D textured model, select the [textured] style in the visualization bar before exporting.
Otherwise select another style.
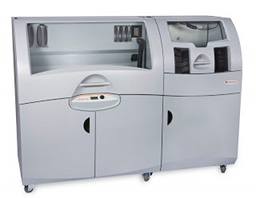
3D Printing
It is possible to upload your model into a 3D printing service company and then order a physical object.
- [upload Size]: to select the size of the final real object to be printed out in 3D using the [upload, print] function.
- [upload, print]: to upload the current 3D model to a partner website for 3D printing.
Shortcuts
Keyboard shortcuts are not available on iOS iPhone/iPad version.
- [1] default mode
- [2] draw mode
- [3] edit mode
- [4] zoom mode
- [5] texture translation mode
- [6] texture scale mode
- [S] save
- [U] undo
- [Space] merge
- [Backspace]/[Delete] Remove current shape
- [C] color
- [X] view toggle on the X plane
- [Y] view toggle on the Y plane
- [Z] view toggle on the Z plane
- [V] toggle 4 panel/Single panel View
- [M] mirror Toggle (None, X, Y, Z)
Using Archipelis Designer to create Second Life content
Introduction:
Archipelis Designer can export 3D models into Linden Labs' Second Life (SL) format.
It is important to remember that you will need
- a Second Life account.
- some L$ (Linden dollars) in order to pay Linden Labs (owner of Second Life) for uploading
images. L$10 are taken for every uploaded image. A 3D model from
Archipelis Designer will be converted into images to get scuplty prims definition
(one image per shape and one image per texture of a shape).
Thus L$100 to L$200 is required for one model (hopefully, it is a small amount
of real dollars).
Archipelis Designer restrictions use:
In order to import acceptable 3D models made with Archipelis Designer into Second Life, please use the following guidelines:
- do not use any operators like intersection or difference (only union is possible).
- do not use the mirror feature (please draw the mirrored part yourself).
- use simple definitions for your contours (such as banana - keep it simple!). Obviously, you can create a complex model but this model should be based on a set of "simple" shapes.
How to export?
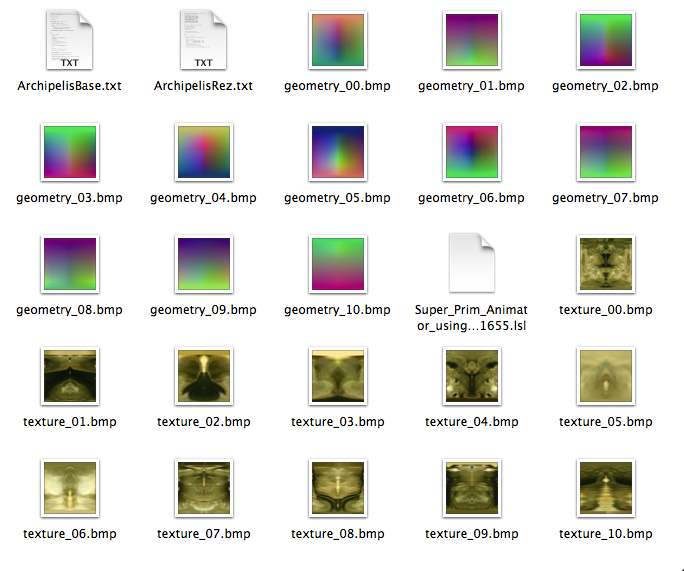
Step 1 - Export to sculpty prims (also called sculpties)
Once you have created a textured model with Archipelis Designer, save it to a project file with [save] or [save as] (if not already done). Then click on [second Life] and [export] menu.
Then, the export process starts immediately. Wait for one or two
minutes and you will find in the directory of your project
file a new subdirectory called "Something.ScultedPrims" (you may
have to confirm the deletion of this directory if it already exists).
Inside, you will find BMP images (geometry_XX.bmp and texture_XX.bmp)
and two LSL scripts (ArchipelisBase.txt and ArchipelisRez.txt).
Step 2 - Connect to Second Life
Connect to Second Life and go to a place where
you're able to build objects (a sandbox area for instance).
As previously said, you will need some L$ to upload
all the images.
Step 3 - Uploading all the images
With the menu "File > Upload Image (L$10)..." and then the button "Upload (L$10)", upload all the images
"geometry_XX.bmp" and "texture_XX.bmp". Close the windows corresponding
to these images.
All these images will appear in "My Inventory > Textures". Click on "Inventory" to
see that.
Note that before all that you may clean up this directory (to avoid conflict with
previous uploads).
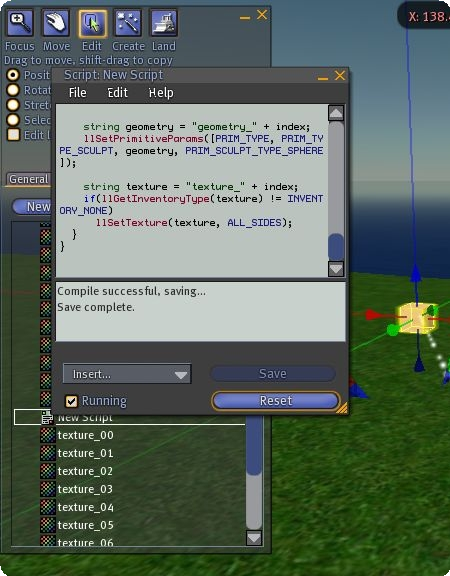
Step 4 - The object ArchipelisBase
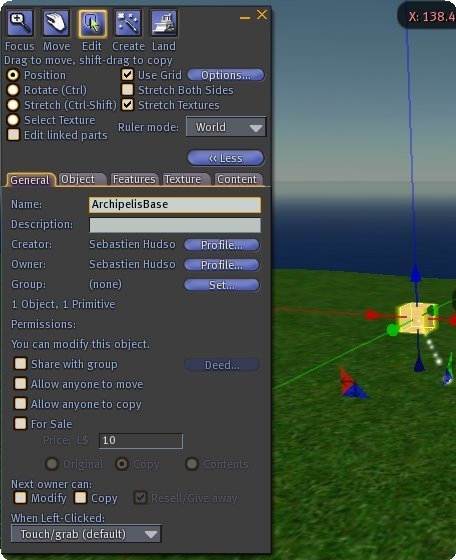
Go in build mode with the menu "View > Build B". Click on "Create" button.
Click somewhere on the floor to create an object (whatever it is, cube, cylinder...).
Here it is important to set the name "ArchipelisBase" to this object.
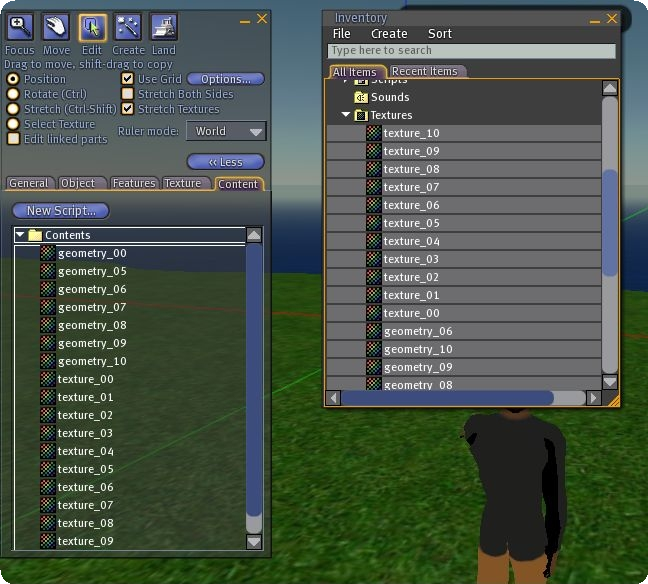
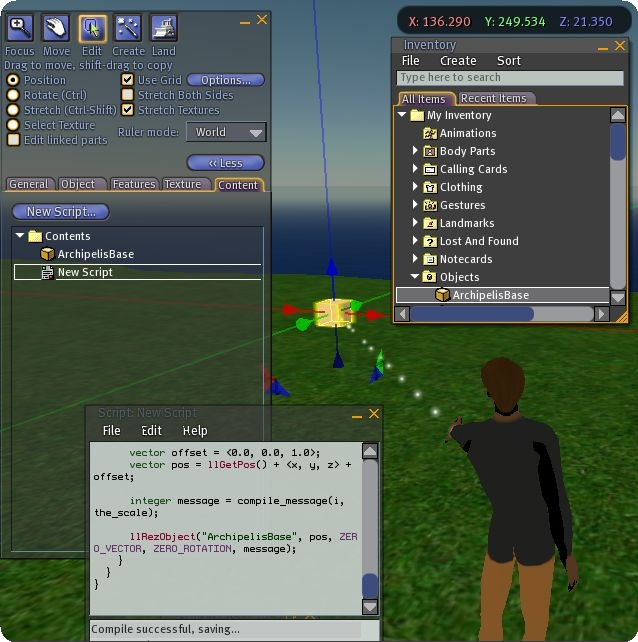
Drag and drop all the previously generated images that are now in "My Inventory > Textures"
into the content of the current object you are editing.
Click on "Content". Click on "New Script...". Double click on the script called
"New Script" that has been created. Copy the content of the file called "ArchipelisBase.txt".
Replace the definition of the script by a paste action. Click on "Save" button and close the
script window.
Select the object you are editing and with the right mouse button click on "Take" to
put it into "My Inventory / Objects".
Step 5 - The ArchipelisRez object
Click on the "Create" button of the build window.
Click somewhere on the floor to create a second object (whatever it is, cube, cylinder...).
You can call this object "ArchipelisRez" but it is not mandatory.
Click on "Content". Click on "New Script...". Double click on the script called
"New Script" that has been created. Copy the content of the file called "ArchipelisRez.txt".
Replace the definition of the script by a paste action. Click on "Save" button and close the
script window.
Drag and drop the object called ArchipelisBase you created at step 4 (it is in "My Inventory > Objects")
into the content of the current object you are editing.
Then, delete the object "ArchipelisBase" in "My Inventory > Objects".
Step 6 - Completing the export
Leave the build mode by closing the build window.
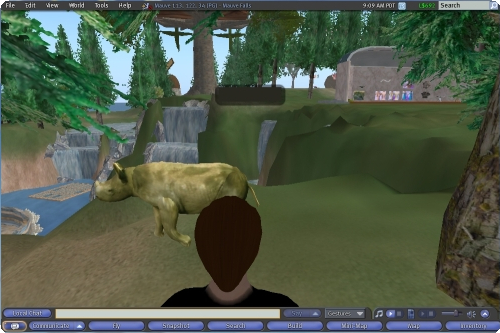
Click on the object ArchipelisRez in front of you to rez. Your 3D model appears.
Now, you can delete the ArchipelisRez because it is no longer needed.
By going back to the build mode (menu "View > Build") in "Edit" mode and by selecting all the shapes of your model, you can rotate or translate the selection.
Once all is OK, you can click on "Take" by
activating the right mouse button to put this model into your inventory. It will be
"My Inventory > Objects > ArchipelisBase" and you should rename it with a better name.
Animation:
Archipelis Designer integrates Fred Beckhusen's animation script. This script allows you to created animated sculpted prims within Second Life (in world).
The documention of this script can be found here:
http://metaverse.mitsi.com/Secondlife/Posts/Prim-Animator/
Collada:
This version of Archipelis Designer allows you to export your model into .DAE Collada format. Some of the vitual world application can import such kind of 3D files.
|